

No. 1183, Shiliang Road, Longwan Village, Panyu District Guangzhou City, China
How to use a printing slotting machine in the process of paper delivery
At present, most of the equipment at the forefront of domestic paper delivery is the way of abrasive paper delivery. When the cardboard is sent to the upper and lower paper rollers by the roller of paper delivery, the advance of the paperboard depends on the pulling force of the paper roller. Therefore, the pulling force of the paper roller must be greater than the drawing force and friction force of the paper desktop and the pressure on the top of the paper and the friction between the cardboard.250 line ceramic reticle rolls if fitted with a hardness of 35. The rubber roll, printing dot and aller type and line are very difficult. This is because the ink layer on the softer roll reticle rolls is thicker, but the steel roll with 180 lines is 75. The cots with higher oothness, either in the field or in the dot, are very easy to print, because the high hardness cots are close to the scraping effect of the scraper. The importance of the rubber roll in the printing slotting machine is seen. There is no brake device in the old machine when it opens the machine. The printing department will turn with the force of the hand when opening the machine and unloading the plate, which brings inconvenience to the operation and adjustment. The mechanical tranission part of the paper feeding section has a pendulum arm. In the process of production, due to some reason (such as sorting and scraping, removing paper wool on the plate, etc.), the machine needs to be stopped. When the machine operation is opened, if the position of the arm is close to the level, it will produce a torsion because of its weight, make the tranission gear turn and cause the "wrong tooth" phenomenon. After the machine is closed again, the waste product is produced because of the deviation from the position of the printing slot, and it must be adjusted again, causing the waste of time and affecting the production efficiency. To eliminate the above phenomena, the down feed wheel and the lower pressure wheel of the printing part are used in the paper delivery part. Although the printing department is the core of the printing slotting machine, in fact, the structure of the printing department is much simpler than the paper and the slotting department. Many people will think that the quality of the printing depends mainly on the number and quality of the reticulated roll and neglects the other factors. This includes the balance and static jump of the printing cylinder, the hardness and the middle height of the ink roller. In fact, the difference between the print of the 200 line and the 250 line reticle rolls is indistinguishable from the use of the scraper knife, so the cots play a decisive role in the uniformity of the ink and the clarity of the dots and the printing of the all words. A cylinder is mounted on the wall of the car underneath the pulley, and two three pipe joints are used on the two pipes that lead to the lock cylinder of the car wall. In contrast to the direction of the wall lock cylinder, the trachea is attached to the installed cylinder, and the rest does not need to increase any auxiliary facilities. When the car wall lock is opened, the cylinder of the car wall is retracted, the cylinder of the brake is pulled out, the head of the cylinder head is on the shaft of the paper wheel or the lower pressure wheel. On the contrary, when the car wall is locked, the brake is automatically recovered. The hardness of the upper feeding roll binder is about 300, and some of them will be higher. As a result, the gap between the two rollers will be too large and the delivery is not accurate enough. If the clearance is too all, it will thin the paperboard and directly affect the compression resistance of the carton. The hardness of the adhesive is reduced to 20 by the paper roll. To make full use of rubber changes when taking paper, the above situation has been significantly improved.
1170 views0 0
Picking the Right Packaging Printing Method for Cartons
Packaging printing can be an extensive subject and picking the right type of printing can be quite confusing if you are not aware of the processes as well as the pros and cons. When you ask for a quote to your packaging manufacturer, you are only limited to the printing technology that they have access to. However, your decision should not be limited by that. Since cartons are rigid and flat, you can get a lot of printing options that other flexible packaging materials do not have. Here are some of the common printing technologies that are available for printing cartons.Lithography or offsetLithography is used for most modern-day bulk printing jobs. Manufacturers use printing plates for lithography. The plates are inked and then pressed onto the paper for printing. Modern-day lithography uses rollers instead of printing plates. The rollers contain the negative of the image that is made by exposing an emulsion t ultraviolet light.Lithography is mostly used to print folding cartons as well as labels, which are also referred to as litho labels.Lithography provides you with retail-quality printing. Coetic boxes, electronic products, and food packaging printing make use of lithographic technology. Lithography has very high print quality. More than four colors can be used in lithography. However, 1 or 2 colors are used commonly. Lithography also allows special coatings to be applied. This gives the product packaging an up-market look. It can be used to give a soft matte touch or a high gloss look. Lithography also produces ooth color gradients where banding is not noticeable.The biggest drawback with lithography is the tooling cost and the lead time. To make sure that the costs stay low, one has to order high volumes of printing. Many lithographers have a high minimum number of prints that you have to order. Also, lithography printing can only be done on flat surfaces.Flexography for Packaging PrintingFlexography is commonly used for stand-up pouches. However, manufacturers use it for corrugated boxes too. The method is quite similar to that of Lithography, but instead of flat plates, a flexography uses a light-sensitive polymer. A 3D relief is prepared which is then mounted on a roller to print the graphic. In Flexographic printing, your cost of printing will go down. Plus, tooling costs are much lower. Only the plate needs to be prepared. It has faster turnaround time and can use both water and oil-based inks.Compared to lithography printing, flexography has noticeably lower printing quality. It cannot be used for printing photo quality images. Moreover, while printing ooth colors or gradients, flexographic printing has visible banding. Registration with 4 color processes is also much more difficult.Digital or Inkjet PrintingDigital printing is extensively used in all-scale print jobs. When it comes to paper products, digital printing is used quite a lot. Labels, films for flexible packaging, folding paper cartons, corrugated boxes – all of them use digital printing. Even packaging prototypes make use of digital printing.Digital printing is quite easily accessible. This is because it comes with zero tooling costs. No prior setup is required. You can just go to the manufacturer with a design and get it printed right there. Most printing companies also have a low minimum order quantity when it comes to digital prints. It has quick turnaround times and with the correct configuration, it gives printing quality that is comparable to lithographic printing.Digital packaging printing is inconvenient to print in large volumes. This is mostly because it takes a lot of time to print a single sheet. Moreover, digital printing requires color calibration. Digital printing does not come with any protection, like lithographic printing. Moreover, digital costs cannot use metallic inks and per unit costs are quite high, compared to lithographic or flexographic printing.RotogravureRotogravure is typically used for stand-up pouches. Folding cartons also use this technique. Rotogravure process consists of an engraved cylinder that is used to transfer the ink to the substrate. The engraved cylinder presses the paper or film onto the gravure cylinder which is eared with the ink. Rotogravure is not very common when compared to flexographic or lithographic printing, but is still used in commercial printing. It can provide premium quality prints with calibrated colors, has 4 color process and can easily add PMS colors. Rotogravure printing also provides very long lasting prints.Tooling costs are quite high in this process of printing. Therefore, if you are investing in this process, you better order a high print volume. The complicated tooling also increases the lead times.Silkscreen or ScreenSilkscreen is used for printing labels, folding cartons, promotional items and also for prototypes. It is a great option for custom packaging printing especially when the packaging is made independently. This includes caps and bottles, custom-made mugs and shirts. The set-up cost is also quite minimal. A polymer mesh is used to transfer the ink to the substrate. Here, the mesh acts as a stencil. A squeegee is used transfer the ink through the mesh and onto the surface. Silkscreen can also be used for aller volumes and does not always need a flat surface.The production speed with silkscreen is much lower. A lot of the process requires manual effort and hence human error may screen in. Moreover, the print quality is quite low, colors are not accurate and is not a good option for high volume printing.What's Right for You?The best printing solution depends on your requirements and your budget. If you want high-quality prints with accurate colors, flexography should be your first preference, followed by lithography. For aller volumes, you can also go for digital printing. If color accuracy is of utmost importance to you, then you can go for Rotogravure printing too. A silk screen is a good option for low cost and low volume projects.
1399 views0 0
Standardisation of Ink Transfer for Converting Corrugated Paper Board
The recent release by FEFCO of a new Standard for Converting equipment further emphasises the constant demand by the corrugated industry for consistent print quality, regardless of the press equipment being used. By categorising the key elements of the printing process, such as “Colour variation”, “Ink Consumption”, “Ink system cleanliness after wash-up”, printers, Press OEM and suppliers, can now all work to a common defined standard for converting corrugated paper. This will help to ensure their products are correctly specified and toleranced, in order to meet the specific targets of each of their clients.To document this standard, the FEFCO team, collected and analysed considerable amounts of data, with a fundamental part of the printing section being to understand and quantify the process of Ink transfer through the printing system. In order do this, it is first important to define the term “Ink Transfer”. Within the corrugated converting system, “Ink Transfer” can be defined as “the weight of ink applied to the board, every print repeat”. In relative terms, it can be quantified by measuring how much ink is at the start of the process, specifically, the quantity of ink carried by the anilox roll, in relation to the quantity of ink at the end of the process, essentially, the amount of ink on the surface of the paper board. By defining and measuring the quantity of Ink as an Ink Film Thickness (IFT) in microns (um), it is possible to calculate the relative Ink transfer through the flexo printing process using the simple calculation:Relative Ink Transfer in Flexo =% IFT = IFT on Paper board x 100%IFT on AniloxFEFCO Standard calculation for Ink TransferWhy is understanding Ink transfer important? Taking a look at the causes of common defects in flexo printing, will quickly answer this question, with the majority of defects such as Dot gain, dirty print, skip out, mottling, pin-holing, to name a few, being caused by having too much or too little ink, being transferred through the printing system. This leads to variations in print quality from press to press and from job to job. These are the major hurdles to achieving right-first-time graphics and consistent printed box quality. To eliminate these defects is a constant batttle for convertors, meaning that incorrect Ink transfer can frequently be the direct cause of delays with press set-up, increased downtime, product reject & waste and increased consumable costs. For high quality, cost conscious printers, Ink Transfer matters a lot!Study of Ink Transfer: In a recent project to study Ink Transfer in corrugated printing, one of several sponsored by Pamarco Global Graphics, industry specialist Wilbert Streefland, organised a series of tests on the Bobst Masterflex press, located at a DS Smith plant in Germany. By installation of 2 calibrated Pamarco Eflo anilox rolls into the chambered inking systems, the target was to measure Ink transfer through the converting process and to study the changes in Ink transfer in relation to the common variables of corrugated flexo printing. The key variables tested were 1) Press speed, 2) Paper Board type & quality, 3) Ink density, 4) Water addition to ink 5) Single colour & Wet-on-wet, 6) Full & half tone plates and 7) Anilox specification & cell profile. Weighing the ink loss after each print repeat: One of the unique feature of the trial, was the method used to measure ink transfer. By installation of a precision weigh scale under the ink bucket on each of the print units, and linking with a press sensor to trigger the ink weight measurement with every sheet that passes through the print station, it was possible to accurately measure the ink loss with every sheet of board printed. In a series of 7 different trials, using over 10,000 sheets of board, at print speeds of up to 7000 sheets per hour, the data collected and analysed exceeded 60,000 individual weight measurements.By measuring the exact Ink film thickness of the anilox at the start of the process and by knowing how much ink was deposited on each sheet of board, it was possible to calculate the exact quantity of ink transferred through the process. Hence by monitoring the variations in relative ink transfer with every changing variable, it was possible to determine, which variables had the most significant effect on ink transfer.One unexpected finding of the testing was that the ink loss on one print unit was significantly higher than on other units, to a point where ink transfer had exceeded normal print conditions. This led the team to identify a leaking ink pipe, which was causing ink to be deposited to waste at a rate of several kilograms per hour and a cost of many euros per day. Besides corrupting the data until the problem was fixed, the obvious conclusion of this chance discovery was to consider that the inclusion of an inexpensive weigh scale on each press ink station, could easily identify these types of faults and lead to substantial savings in ink costs on a daily basis. “Press manufacturers take note of potential upgrades!”What are the key factors for good ink transfer in flexo: Several of the conclusions from the trial were expected, such as the addition of water can improve ink transfer, but is offset by a substantial reduction in print density. The trials certainly proved that the addition of uncontrolled quantities of water to the ink is definitely not recommended when trying to maintain controllable levels of colour density. Other results which indicated that wet-on-wet printing gave higher ink transfer than single colour printing were less predictable and would require further testing to quantify the impact on high graphic printing.EFlo anilox: Based on previous tests and industry experiences, it was no surprise to learn that the EFlo anilox had the highest ink transfer in all tests, with the extended cells, proving to give optimum ink transfer under all conditions. However one of the most significant and unexpected findings from the trials was that the relative ink transfer values in all tests, always stayed within the range of 12 to 35%, a surprising low value and certainly one which leads you to ask, what happens to the rest of the ink?Press speed & Ink density: The tests demonstrated that when using high density inks, speed variations between 3500 & 7000 sheets per hour, had very little impact on ink transfer. However when using low density or water diluted inks, which is probably more normal conditions for many board convertors, higher press speed, gave reduced the ink transfer.The substrate is critical: One of the fundamental conclusions of the trial and one which is no surprise to many experienced corrugated printers is that minimum amount if ink that needs to be transferred to the paper substrate is dictated BY THE SUBSTRATE! This means that selection of anilox specification to suit the type of paper board remains the critical decision for printers and press OEM. When printing on un-coated board, you should select an anilox which has sufficient Ink Film Thickness (often referred to as Cell Volume), to provide enough ink for good coverage and print density on that board. This project has shown that changing ink density and press speed will only take you so far; therefore matching anilox specification to paper board remains a fundamental decision for optimising print results.In conclusion, it is believed that these trials are the most comprehensive study of ink transfer through the flexo converting process in a practical and commercial printing environment, but as with many ground breaking projects, in answering some questions, many new questions are also raised. Certainly it is thought provoking that 65-88% of ink remains within the inking system either in the doctor blade chamber & pipework , on the surface of anilox roll. Little wonder that maintaining the cleanliness of anilox remains a major task for printers when trying to produce consistent print results”.
1344 views0 0
Increase Press Speed!
What’s Required to Increase Press Speed?In order to understand what is necessary to improve press speed, it is helpful to step back and remember the big picture. If you look at print growth over the years, the real issue with press speed has simply been a lack of technology. As knowledge and machinery abilities have increased, so has press speed. The machines coming out now are not as gear-driven as the presses that came out in the 60’s, 70’s, and 80’s.The challenge with that growth has been finding ways to get more scientific data with the numbers that involve line screen and volume.Along with the improved ability to harvest this data, the increase in press speeds can also be attributed to the advancement of plate technology, pre-press, and higher quality inks. Press speeds in the past were less than 800 feet, but now they’re close to 3,000 feet. Some CI presses are averaging speeds of 1,200 to 1,400 feet, and still looking to increase, and a few are even running 2,000 feet already.I believe that these increased speeds are a result of five areas in which there has been great improvement over the years:1. Enhanced art work.2. Thinner plates with better ratios of anilox cell to dot-on-plate.3. High line-screens with more volume due to higher-wattage lasers.4. Servo drive machines instead of chain driven – tailor made for the customer.5. Cad cam designs from press to anilox with tighter tolerances.While growth in any of these five areas nearly guarantees improved speed and quality, it is impossible to get repeatability without correct and consistent equipment. Are you using the optimal gear for what you want to print? Do you have the proper anilox roll engravings for the volume you need? Take the time to find out what works for you.The angle of the cells, the carrying capacity of the cell and the number of cells per linear inch. I think banded roll testing is important to increase press speed because it will help you find exactly the right anilox roll for what you want to print. The anilox is known as the “heart of the press” for good reason. Choosing the right roll helps to create a good foundation for a variety of printing challenges. When it comes to increasing press speed and maintaining quality, finding the right anilox is a critical step.
1345 views0 0

Web Handling: Top 7 Causes of Wrinkles
How to identify the source of a web wrinkling problem and then determine the cure.Web wrinkling during converting can come from a variety of sources--sometimes multiple sources. Thus, pinpointing the exact cause and cure is not always easy. In fact, it is often a process of trial and error.This article addresses seven common causes of web wrinkling along with practical solutions. It should be understood up front that no two webs or web lines run exactly the same. Likewise, no two wrinkling issues are identical. The cure for one may not be the cure for another, no matter how alike.In addition, the causes of web wrinkling can vary greatly. Nonetheless, armed with a better understanding of some of the common causes and cures can help minimize trial and error efforts to get you back on target with your desired productivity and quality goals.Machine misalignment leads to roll misalignment.1. Poor Machine AlignmentMachine alignment is the first thing to check when experiencing web performance problems (see Figure 1). New rollers may be a waste of money if machine stands are not aligned properly. Though most machines are aligned when first installed, misalignment can develop later due to vibration, improper machine or roller maintenance, tension over time, or in colder climates, even freeze-thaw conditions that can shift plant floors.Poor alignment between rollers ultimately can cause a wide variety of web problems, including drift, flutter, and wrinkling. Straightening out the slightest misalignment is critical to achieving a higher quality process.Though alignment services can be tedious or costly, you may save time and money over other remedies that simply do not work. Checking machine alignment is an essential starting point and a good investment.Poor roll geometry can lead to tension differences that cause wrinkling.2. Poor Roller GeometrySometime, a non-cylindrical roller can be the cause (see Figure 2). Imagine a racecar whose tires are larger in diameter on one side of the car than the other, so the car turns naturally inward on the oval track. Likewise, the web will “turn” if the roll is bigger on one side than the other. When the web contacts the following roll at an angle, this roll will try to readjust the web back parallel to the roller’s centerline. This generally results in a wrinkle.Poor roll geometry can come from poor craftanship in the design and/or manufacture of the roll, from excessive surface wear or from inadequate roll specifications.3. Poor Web QualityPoor web quality such as gauge variation or poorly wound parent rolls can cause all kinds of problems. Excessive parent roll run-out can translate into vibration and web flutter. Inconsistent or poor quality web material can end up creating wrinkles through the whole process. No roller can totally cure that.Most machine operators can tell when they have a bad parent roll on the stand. Don’t accept inferior parent rolls from your upstream supplier. Once again, do not try to treat the symptom, but attack the problem at the source.Roller deflection from higher web tensions can create tension differences between edges and inside material that can cause sagging centers and/or wrinkles.4. Excessive Roll DeflectionExcessive roll deflection, or bowing of the roll under the force or load of the web, can cause wrinkling (see Figure 3). It may not be the effect of a single roll that causes the problem but the effect of the total system.Like so many other situations, the extent of the problem will depend greatly upon the web characteristics. Small-diameter idlers with long face lengths should raise a red flag for any roller supplier or machine designer. Roller material (steel, aluminum, or carbon composite), roller diameter, wall thickness, face length, web width, shaft sizing, and bearing location all have to take load, or deflection, into consideration.To avoid deflection problems, be sure your rolls are properly specified. When ordering, you should know the amount of web wrap (usually stated in terms such as 10 o’clock to 3 o’clock), web tension (PLI), any nip load (PLI), web width, and maximum expected line speed. A good supplier will walk you through these questions and can even help you troubleshoot much of this over the phone.5. Web ExpansionChanges in web conditions such as increased temperature or moisture content are likely to cause variation in the web material. For example, when a web tries to expand and it is constrained by frictional contact with a roller, wrinkles are likely to occur. In these cases, a strategically located spreader roll—one with a special surface grooving—can accommodate the variation and alleviate the tendency of the web to wrinkle.Unsupported webs are more likely to wrinkle6. The Unsupported WebToo little web support can result in bagging and wrinkling (see Figure 4). Unsupported webs also are susceptible to other environmental factors, such as the drafts from nearby equipment or normal plant ventilation. Even an open door can cause enough draft to result in wrinkling.Idlers typically are used to provide needed web support. The very act of wrapping a web around a roller does increase the web’s lateral rigidity. The strength and weight of the web will have a lot to do with the number and location of idlers needed. An applications engineer can better troubleshoot your problem when provided an elevation side view indicating rollers and location(s) where wrinkling occurs.If wrinkling occurs on a longer web span between rollers, additional idler support may be needed. When evaluating web span, consider the width of the web. A rule of thumb is: short = less than the width of your web; long = 3x the width of your web.7. Improper Web Tension ControlExcessive web tension can wrinkle, stretch, or break the web and cause unwanted roll deflection. Excessive tension can come from too much drag on idler rolls (bearing friction, roll weight, etc.) or from too many idler rolls between drive sections. Stretched edges and slack centers on the web are common with excessive tension.Loose webs also can result in wrinkles. Lack of sufficient tension can come from drive sections being out of sync or a poorly designed or calibrated tension control system.Lighter weight rolls may be the solution for tension problems experienced during line speed changes. These idlers can supply support without excessive drag. If the problem persists once the web is up to speed, an idler designed with special free-running bearings may be needed.If you suspect tension problems are from too many rolls or rolls that are too heavy, try experimenting. Spin individual idlers by hand. Are they hard to turn? Can you selectively remove or replace some rolls and see problems can be reduced?If you are running a light web at light tension, and all your rolls are heavy steel idlers with sealed bearings, you could try lighter-weight idlers with free-running bearings to reduce roll inertia and drag. Lighter materials, such as aluminum or carbon fiber with free-running bearings, can significantly change operating performance.Regardless of the many precautions and cures you might apply to your web converting operation, sometimes wrinkling is just going to happen. In some instances, a special roller will help. In others, it won’t. The problem may be in how the parent roll was wound. It might be in the makeup of the material itself. The cause may be a combination of things, some of which may be out of your control.There is no magic cure for wrinkling. Do your homework and then look to the experience and advice of a qualified roller manufacturer to help work through the options.
1375 views0 0
The Secret to Better Corrugated Board with Less Starch
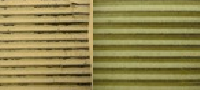
Consumers in the corrugated industry are demanding a decrease in starch consumption. And not just for the cost savings either. Instead, it is the thinner, weaker paper – with weights as low as 80 grams – that are used for gluing board. This type of paper requires the application of less starch, as little starch as possible in fact. Add the fact that both water and heat are enemies of paper; applying too much water, has a negative effect on the ooth application of starch requiring more or longer drying, with all negative consequences for the quality of the paper. Another trend seen in the industry nowadays, is the fast-growing market for E-flutes and Micro-flutes. The flutes per linear meter for E-flute board are 295 (90 in inches), requiring a consistent application of a low dose of starch onto the board! The application of the level of starch is influenced by two factors:1. The gap between glue and doctor roll;2. The screen/profile on the glue roll;The gap between glue and doctor roll applies for approximately 60% of the glue application and this parameter can only be controlled by using the tightest tolerance in the manufacturing process of both the glue and the doctor roll. This is mainly determined by the materials that are used to manufacture the glue set, and its durability and reliability on the long term. Best results are reported when using a stainless steel glue roll in combination with a ceramic doctor roll. Of course, both have to be according to OEM specifications, even after one or two times reconditioning. In this case, special attention has to be given to the diameter build up of both rolls, preferably with durable materials such as steel or stainless steel. 2nd parameter determining almost 40% of the volume of starch/glue that in the end is transferred onto the Corrugated board, is the screen of the glue set.Theory behind finer screen countsGluing of board can very well be compared to the printing of board. In theory, a finer line count or finer pattern, results in a more detailed print result. The exact same happens with the application of glue: a more even layer of glue is applied onto the board.However, in all honesty, it is also necessary to mention that the finer the line count, in most cases, also the shorter the lifetime of the glue rolls is. In the recent past, very good results were achieved with screen counts of 50 l/cm (130 lpi). Beautiful even layers of glue were applied onto the board, but the minute the glue roll came into contact with the corrugator roll, very easily damage occurred to the fine walls of the cells, creating all sorts of issues like score lines.Together with leading companies in the corrugated industry, glue set manufacturers discovered a compromise that is currently often used while producing board, in the situation of Single-facers as well as Double Backers. A standard engraving of 10 l/cm with volumes of 120 cm3/m2, with an angle of 45° (25 lpi, vol. 78 bcm) and the screen of 15 l/cm with a volume of 60 cm3/m2, also with an angle of 45° (40 lpi, vol. 39 bcm) both deliver very consistent and satisfying results in the application of glue.CONCLUSION:Optimal starch consumption and reduced volumes are only possible with a reduced gap and the absolute tightest tolerances on the doctor roll and glue roll. Furthermore, the application of glue is determined by the screen count, as well as the screen pattern. It may be worth asking your glue- and metering roll manufacturer for the latest developments in this particular field of surface engravings, in order to realize significant cost savings thanks to improved board quality, reduction in paper waste, less starch consumption and less energy consumption (for drying).
1278 views0 0

Mr.Wang
General Manager
Industry experience:5 Year
language:Chinese,English
Responsible area: Global
Contact
