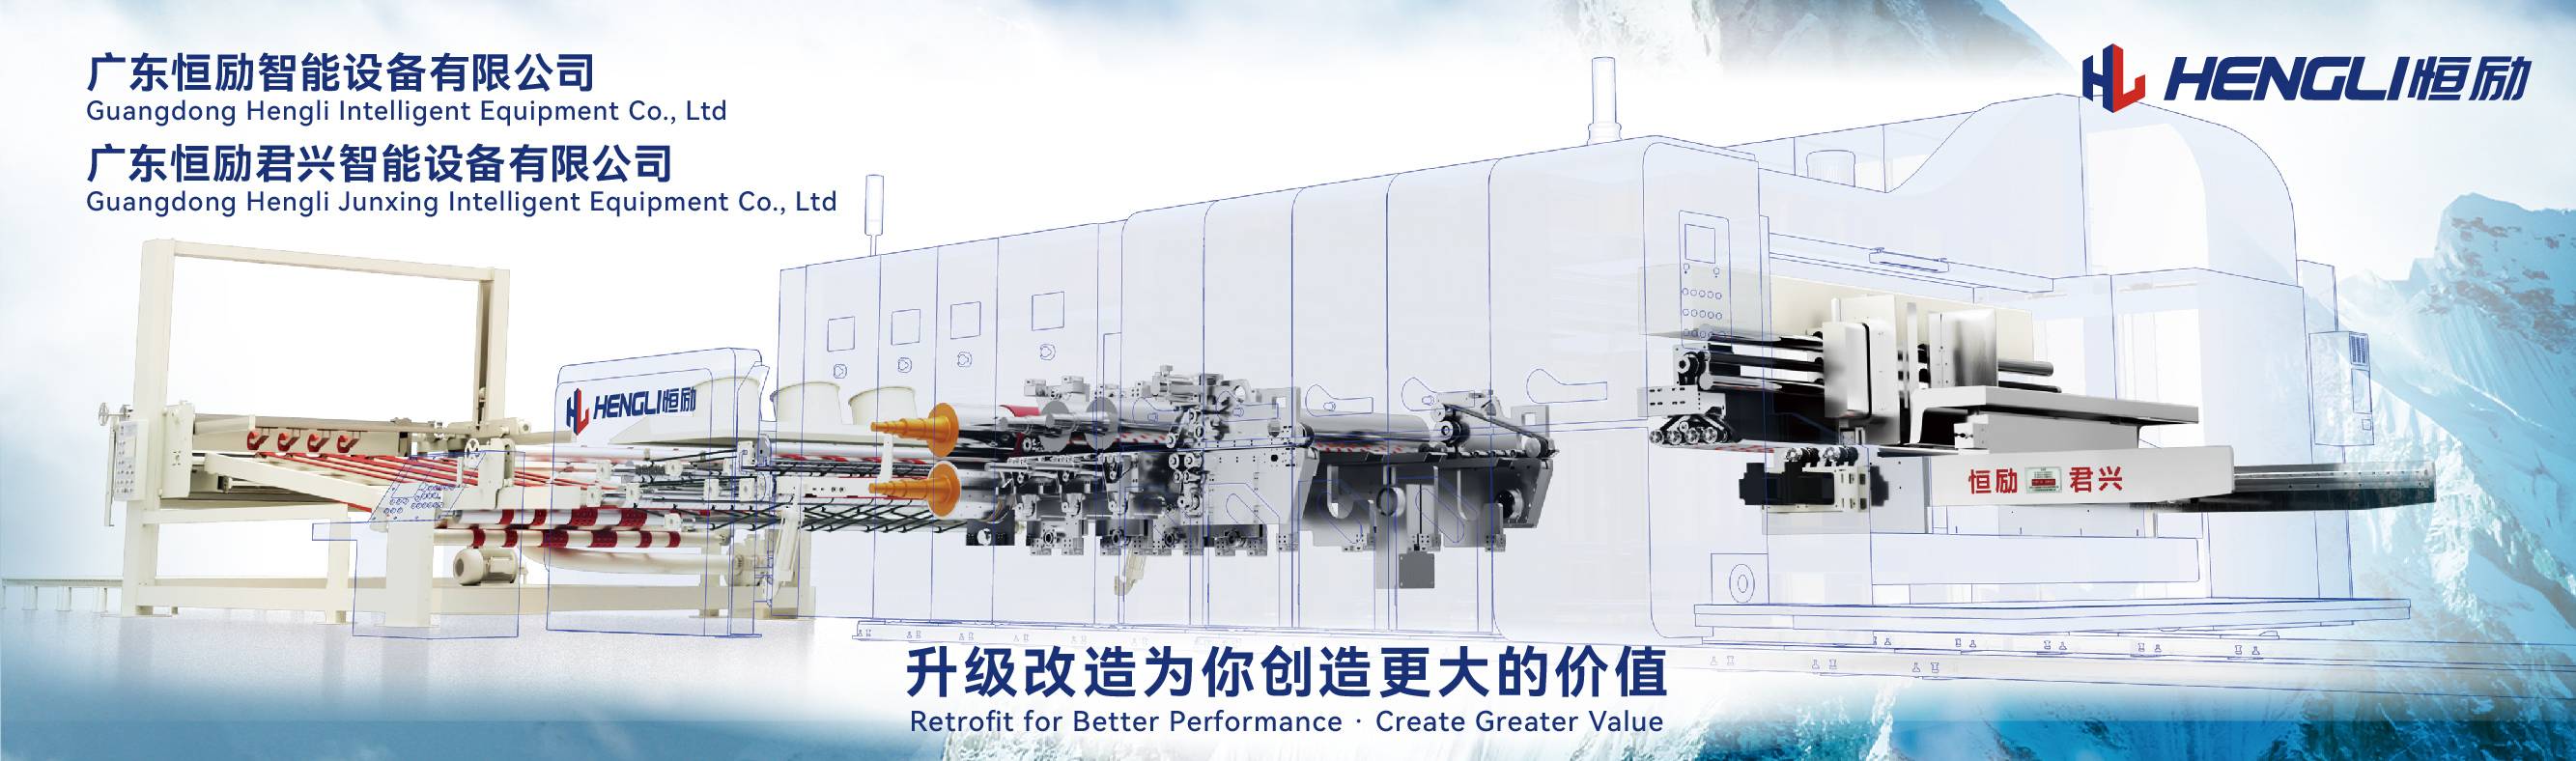


No.1 Jiaochang Street, Shiji Village, Shiji Town,?Panyu District, Guangzhou, China.

Argentina

Egypt

Russia

Malaysia

Mexico

Saudi Arabia

Slovenia

Turkey

Vietnam

China
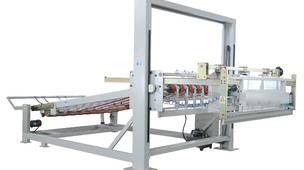
Hydraulic Automatic Dual-gantry Paper Stacker ( Picture for reference only )
Hydraulic Automatic Dual-gantry Paper Stacker ( Picture for reference only )
Hydraulic Automatic Dual-gantry Paper Stacker ( Picture for reference only )
Hengli Automatic Vibrating Waste Cleaner ( Picture for reference only )
Hengli Automatic Vibrating Waste Cleaner ( Picture for reference only )
Hengli Automatic Vibrating Waste Cleaner ( Picture for reference only )
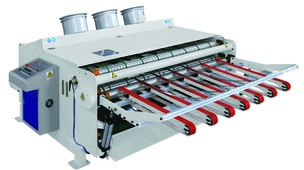
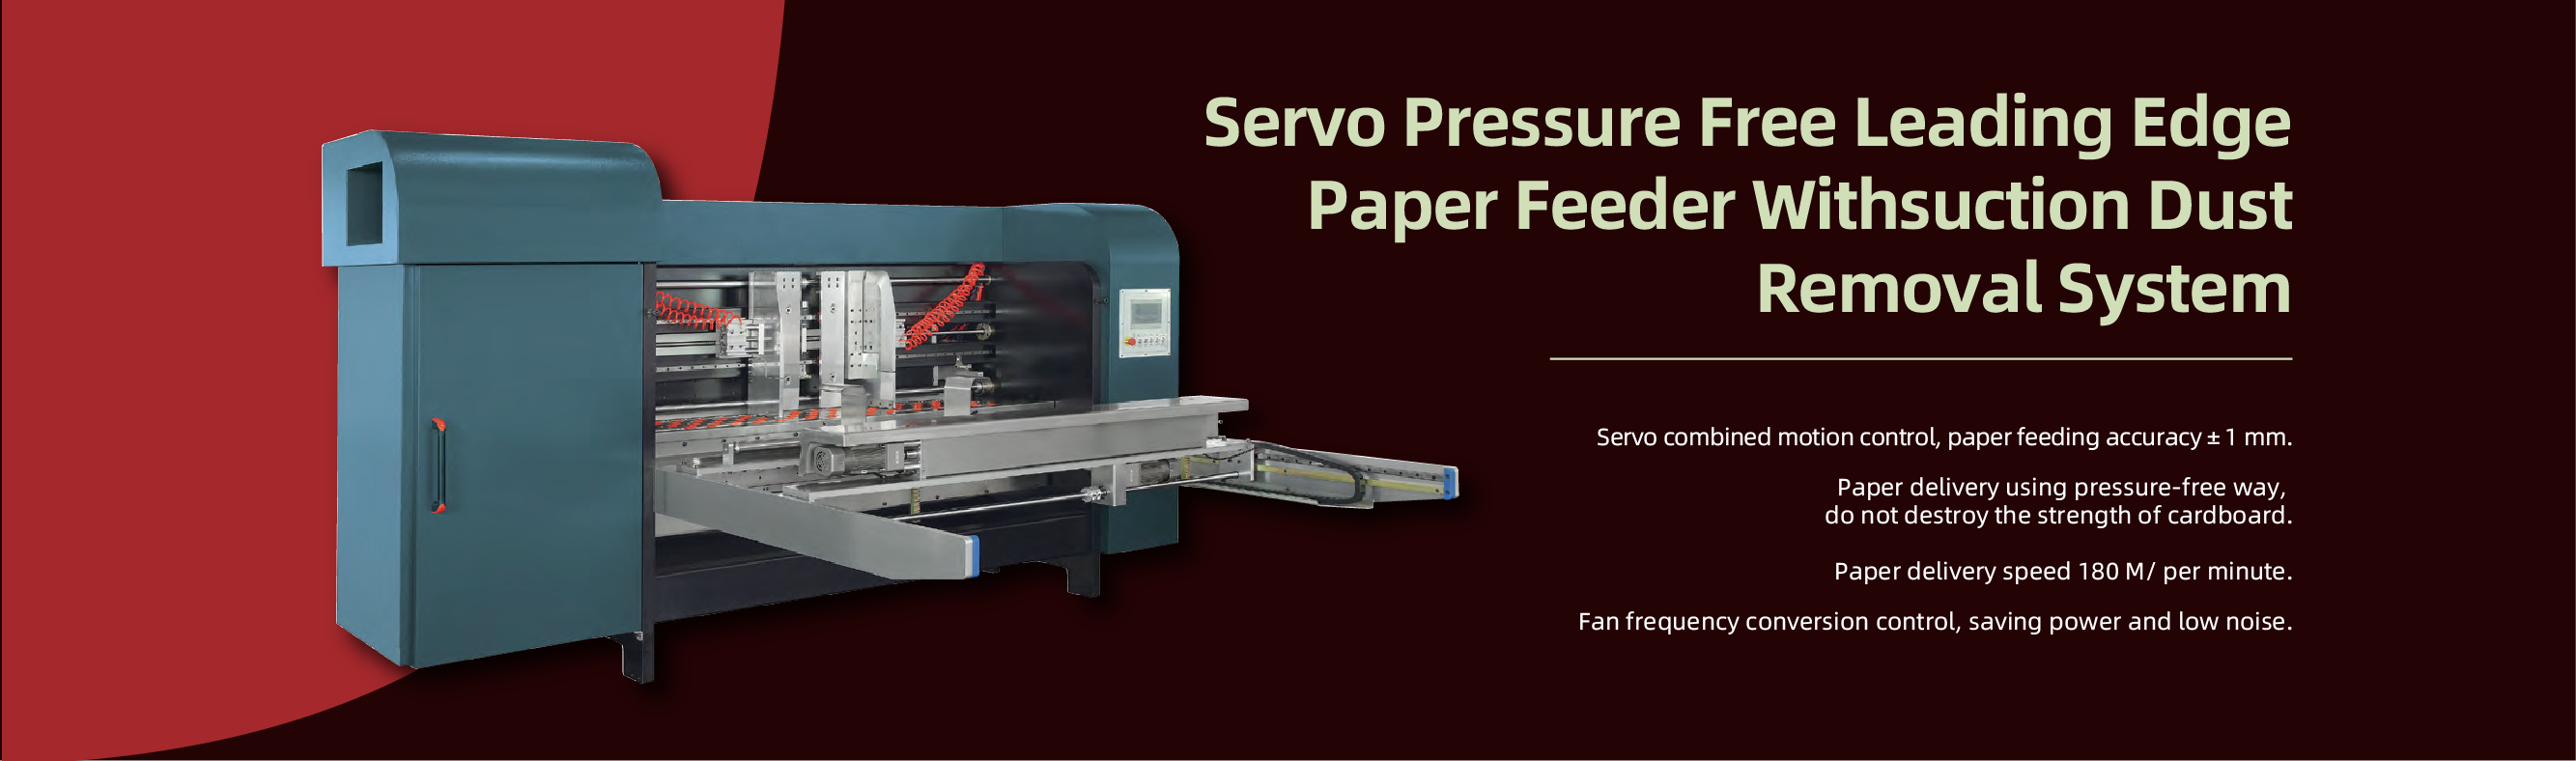
Guangdong HengLi SERVO PRESSURE FREE LEADING EDGE PAPER FEEDER WITH SUCTION DUST REMOVAL SYSTEM

Guangdong HengLi SERVO PRESSURE FREE LEADING EDGE PAPER FEEDER WITH SUCTION DUST REMOVAL SYSTEM

Guangdong HengLi SERVO PRESSURE FREE LEADING EDGE PAPER FEEDER WITH SUCTION DUST REMOVAL SYSTEM

Guangdong HengLi SERVO PRESSURE FREE LEADING EDGE PAPER FEEDER WITH SUCTION DUST REMOVAL SYSTEM

Guangdong HengLi SERVO PRESSURE FREE LEADING EDGE PAPER FEEDER WITH SUCTION DUST REMOVAL SYSTEM

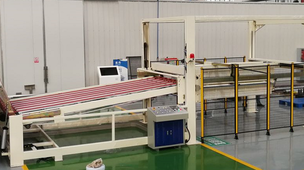
Hengli Hydraulic Automatic Counting Paper Stacker

Guangdong HengLi SERVO PRESSURE FREE LEADING EDGE PAPER FEEDER WITH SUCTION DUST REMOVAL SYSTEM

Guangzhou Hengli Multi-al integrated molding machine Multi-al integrated molding machine

Guangdong HengLi SERVO PRESSURE FREE LEADING EDGE PAPER FEEDER WITH SUCTION DUST REMOVAL SYSTEM

Guangzhou Hengli Multi-al integrated molding machine Multi-al integrated molding machine

Guangzhou Hengli Multi-al integrated molding machine Multi-al integrated molding machine

Hengli Hydraulic Automatic Counting Paper Stacker
Hengli Hydraulic Automatic Counting Paper Stacker

Hengli Hydraulic Automatic Counting Paper Stacker

Hengli Hydraulic Automatic Counting Paper Stacker
Hengli Hydraulic Automatic Counting Paper Stacker
Hengli Hydraulic Automatic Counting Paper Stacker
Hydraulic Automatic Dual-gantry Paper Stacker ( Picture for reference only )

Hengli Hydraulic Automatic Counting Paper Stacker
The Printing Process in the Corrugated Industry
What is the most commonly used printing process in the corrugated industry?I’m sure all of you would have come across many times in your life, various cartons printed using the processes I’ll be talking about. As I mentioned before, a little knowledge can go a long way.It’s important when you are in front of a customer discussing products that you can identify the type of print processes used on the box. Depending on whether it’s lithographic or flexographic will have a huge effect on price. You want to ensure that you quote the customer what they need and equally important is to get it right the first time.I’m not going to bore you with a lot of technical jargon. What I would like to do is help you understand and provide a little knowledge so you can confidently have an open discussion with your customers.If you’re not too interested in the technical differences between both processes just focus on the information contained in both sections below. The information focuses on explaining some of the advantages and disadvantages of each print process.If you are interested in a little more technical knowledge then read on.FLEXOGRAPHYLet’s begin by talking about the most commonly used printing process for shipping type corrugated boxes. Most of the shipping boxes “if printed” would be printed via the flexographic process.Flexography often abbreviated to “flexo” is a method of printing most commonly used for packaging (labels, tape, bags, corrugated boxes, banners and so on).A flexographic print is achieved by creating a mirrored master of the required image as a 3D relief in a rubber or polymer material commonly known as print plates or stereos. The inked plates have a slightly raised image and rotate at high speeds to transfer the image to the print surface. A measured amount of ink is deposited upon the surface of the printing plate using an anilox roll. The print surface then rotates and the doctor blade ensures the ink transfer on the anilox roll is consistent when contacting the print material which then transfers the ink onto the print surface.Flexographic plates are made utilizing a relief type plate. The technology employs plates with a raised image (relief) and only the raised image come in contact with the substrate during printing.Flexographic plates are made of a flexible material, such as plastic, rubber or UV sensitive polymer (photopolymer), so that it can be attached to a roller or cylinder for ink application.The flexibility enables the plate to wrap around the print cylinder.There are 2 main plate manufacturing processes which the corrugated industry use. One being liquid resin or polymer which is the more commonly used plate. It’s perfectly suited for letterpress or block style printing and is the less expensive of the two.Solid plate is also used but the plate material and manufacturing process is more expensive. This type of plate has a higher gerometer which means it’s a harder compound then the liquid resin. Solid plates enable the print machines to produce a higher quality print.For every colour to be printed, a plate is made for each colour and eventually put on a cylinder which is placed in the printing press. To make a complete picture, regardless of printing on flexible film or corrugated paper, the image transferred from each plate has to register exactly with the images transferred from the other colours. To ensure an accurate picture is made, registration marks are made on the flexographic plates.These registration marks can be various types depending on the manufacturer’s standards. They could be round dots and/or crosses. When setting up the run these marks become very important for several reasons. Firstly, the machine operator uses them to line up the colours which ensures the colours fall where they are supposed to on the substrate. Secondly, they help reduce set up time on the machine. They are also used during the run for quality control and shows the operator if the print is still running within registration.LITHOGRAPHYLithography is an "offset" printing technique. Ink is not applied directly from the printing plate to the substrate as it is in flexography. Ink is applied to the printing cylinder to form the "image" and then transferred or "offset” to a rubber blanket mounted on the print cylinder. The image on the blanket is then transferred to the substrate (typically paper or paperboard) to produce the printed product.In offset lithography (litho) a printing plate, which is most often made from aluminium, contains an image of the content that needs to be printed. When the plate is inked, only this image part holds ink. That inked image is subsequently transferred (or offset) from the plate to a rubber blanket and then to the printing surface. The process can be used to print on paper, cardboard, plastic or other materials, but these have to have a flat surface.On sheet-fed presses, the substrate is fed into the press one sheet at a time at a very high speed. Web fed presses print on a continuous roll of substrate or web which is later cut to size.High volume lithography is used today to produce posters, maps, books, newspapers and packaging and just about any ooth, mass-produced item with print and graphics on it.
1232 views0 0

Problems With Printed Packaging Artwork
How to avoid making critical mistakes on your packaging artworkPackaging artwork mistakes can not only be embarrassing, but can cost your business significant amounts of money too.This guide highlights 10 of the most common errors people make when producing their print files for corrugated packaging. And how you can avoid making the same mistakes yourself. It covers:Using fonts and images correctlySoftware problemsHow colours can affect your resultsMuch else besidesAlternatively, please continue scrolling to download a free step by step guide on setting up your artwork in the correct manner.IntroductionMistakes with printed packagingAlthough large multi-national brands will usually have an extensive, in house team of brand and graphic design experts (or be working with top design agencies), mistakes can still slip through.And whilst the worst of these can cause much hilarity on social media, they tend to be highlighted on high volume, consumer facing packaging.But what about transit packaging? And businesses that may not have the resources or budget to employ or hire dedicated art-workers? Graphics and branding is just as important in these scenarios too, right?Well, yes. But unsurprisingly, mistakes can happen here too.This guide highlights the top 10 packaging artwork mistakes that can harm your business – and what you can do to avoid them.What are the costs of making artwork mistakes on packaging?Getting your packaging artwork wrong can have a number of significant, negative impacts on your business.For starters there are the cost implications.Get the artwork wrong initially and, if not spotted in time, you will potentially have stock of boxes that are no longer usable. Besides the costs of these, your investment in printing plates will also become worthless. New ones will need to be purchased.But aside from this, there are other potential issues.For example, not having the required packaging in place could mean a delay to getting products shipped out or launched. It could stop production lines (at great expense). Mean letting your stockists and customers down. Harming repeat business.It could allow your competition to gain market share whilst you are not visible.Perhaps even worse, if incorrect packaging is distributed without the errors being spotted, it could result in negative exposure and coverage for your brand.At the very least, it will make you look unprofessional and amateurish, harming your brand perception. Top 10 Artwork Mistakes.The top 10 mistakes businesses make when setting up packaging artworkLuckily, a lot packaging artwork mistakes can be spotted and resolved before production. And whilst this is not always possible, a switched on packaging manufacturer should be able to identify, and help your resolve, any issues before it is too late.So, without further delay, here are the most commonly seen errors when creating artwork files for ecommerce or transitNot “flipping” the cutter guide (die-line)Not using vectorsUsing low resolution imagesUsing RGB colour space instead of CMYK / PantoneIncluding fonts which are too allNot outlining fontsNot including bleedsUsing a heavy (or weak) blackIgnoring safe margins / white spaceUsing Microsoft programmesNot proof reading before sending to printContinue reading below for further explanation on why these can cause such a problem, and how to make sure this doesn’t affect your business. 01: Artwork Orientation.Not “flipping” the cutter guide (die-line)It is obviously a sensible idea to use your packaging manufacturers cutter guide (also referred to as a die-line) when creating your artwork. But this is a potential banana skin.Structural drawings of your boxes will show the inside view, as this allows for the relevant crease lines to be added.But if you lay your artwork onto this, the text and graphics will not appear in the correct place when printed onto the outside of the box (this is obviously OK if you want the inside printed, as per some ecommerce packs).This typically means logos, text and graphics do not line up correctly / as intended on the relevant faces of the box.The easy solution to this? Simply select the cutter guide within your editing software and flip the drawing from left to right (in Adobe Illustrator for example you can do this by going to Object > Transform > Reflect).If in doubt, always check with your packaging supplier. They most likely will be able to supply the cutter guide in the correct orientation for you.02: Vector GraphicsUsing raster file types instead of vectors.If you start talking about vectors and raster files to average person they won’t have the foggiest what you are on about.But in simple terms, raster files (also referred to as bitmaps) are images made up from pixels (tiny dots).These are used for full colour graphics and photographs due to the level of detail that can be achieved. Common formats include .jpeg, .tiff and .png.Vectors on the other hand, are effectively mathematical formulae, which store the lines, shapes and colours that make up an image. These are often saved as .ai, .eps and .pdf files, and are also used for fonts.So how can using one rather than the other cause problems?Well, a vector, being a mathematical formula, can in effect be scaled to any size without losing quality – which is important if you are placing your company logo on the side of a large box or transit packaging.If you are using a raster image, and scaling this up to a large size, the number of dots / pixels does not increase, they just get larger.This results in fuzzy edges and lack of definition, or, even worse, a pixellated appearance. This makes the appearance of your packaging less professional and impactful.So, as a general rule of thumb, use vector files for icons, logos and bold single colour graphics wherever possible. This will give a clean, crisp finish regardless of the printing method you are using for your packaging. 03: Resolution.You don’t know how much packaging you have (or use).Despite the need to use vectors wherever possible, the key limitation of these is not being able to easily reproduce photographic quality or highly detailed imagery.This is why on luxury packaging, packs for many FMCG products and retail items in general, raster images will be used. They lend themselves particularly well to high volume lithographic or digital printing.The problem occurs when images used are of too low a resolution.As mentioned above, raster files are made up of a numerous pixels. The specific amount contained within on inch is the images resolution. In order to be printed successfully (i.e. not look fuzzy or pixelated), the image needs to be a minimum of 300 dpi (dots per inch).The problem of using an image below this resolution (such as those downloaded from the internet, which are typically 72dpi to suit monitors / screens) is a fuzzy, low quality appearance with no definition.This equally applies to a 300 dpi image which is “blown up” to double its size, effectively halving in resolution (to 150 dpi).As such, it is important to use high resolution photography at the correct size. 04: RGB Graphics.Using RGB colour space instead of CMYK / PantoneAnother issue of downloading images from the internet for use on your packaging (alongside low resolution and potential copyright issues) is they are not made up of the correct colours.Physical printing uses 4 different inks to achieve a photographic image – cyan, magenta, yellow and black. These are abbreviated to CMYK.A web image however uses red, green and blue (RGB) colours to correctly display on a screen.As such, an RGB image, if not correctly converted, will look “washed out” and often have very odd colours – certainly looking nothing like how it did on your screen.Using CMYK instead of RGB applies to not only images but your entire packaging artwork file. Most art-working software will allow you to switch between the two, so if you want your colours to print correctly, remember to make sure the colour settings are correct. 05: Small Fonts.Including fonts which are too allWith consumer packaging printed using litho lamination (with a high quality paper laminated onto corrugated material), this is not an issue.But due to the nature of the paper substrate that makes up the outer walls of typical corrugated material being quite porous and rough, there will be a very all amount of ink that bleeds outside of the intended print area.With the majority of graphics and design elements this will not be noticeable. But on something as detailed as all text, it can make the text ineligible (this can be worsened further by using typefaces with a very thin “weight”.As such, it is advisable to not use text aller than 10pt if printing onto typical kraft or test corrugated material. 06: Font Outlines.You can’t meet peaks in demand.Another issue with fonts is having them accidentally substituted before going to print.Imagine for example that your company’s branding uses a fairly rare and unique font. You may possibly have had to purchase a license for using it. And whilst you or whoever is producing your artwork has it installed on their Mac or PC, the majority of other people won’t.And therein lies the problem.If the font has not been embedded in the document (or supplied with the file), when your packaging supplier opens the file the software will look for it. If / when it can’t find it, it will use substitute font instead.Not only will this change the appearance dramatically, it can also mean words becoming truncated or disappearing completely.Whilst most packaging suppliers would highlight this to you, if it slips through your packaging will look nothing like you expected.The simplest solution is to convert all of your text to outlines. These then become vector graphics which are not reliant on finding the font to look correct.Pro tip: make sure you save a copy of your artwork with the text saved as text, and a separate copy with the text outlined to supply to your packaging manufacturer / printer. Once text has been outlined it cannot be edited (i.e. correcting a typo), meaning you may have to re-set the artwork to change the required copy.07: Bleeds.Not including bleedsRegistration is the term given to markings included on packaging artwork and the technology which allows different colours to be printed in the correct part of your document or packaging. Effectively, it aligns the item being printed to the print heads placing the inks.And whilst the latest printing equipment can allow for very tight tolerances on registration, it has to be assumed there is the potential for some movement during printing (which is where trapping and overprinting come in).This is why, when using graphics or even blocks of solid colour that run over a cut line, that you include what are known as bleeds.This basically means you adding between 3mm and 10mm (depending on the print method, equipment etc.) outside of the intended print area (and outside of the cutting area). This means if there is some movement during the printing or cutting, it does not leave unsightly, non printed areas at the edges.Please note that bleeds only apply to blocks of colour / graphics that run outside of the cutter guide, and not between joined panels within the cutter guide itself. 08: White Space.Ignoring safe margins / white spaceSimilarly to needing to include bleeds to allow for movement and poor registration of your packaging artwork during printing and cutting processes, it is also important to adhere to “safe areas” when creating your artwork.A good rule of thumb is to typically leave 15 – 20mm of space around cut and crease lines on your cutter guide. This should prevent graphics or logos being cut-off or stretching across different panels unintentionally.There is another benefit to this however, and this is forcing you to consider the inclusion of “white space”.Including this on your design not only makes the information more legible, but also makes the design look more professional and visually appealing too. 09: Black Inks.Using a heavy (or weak) blackPrinting onto kraft (i.e. brown) cardboard can obviously affect the appearance of your chosen colours.But what many people do not know is that how you set up and “black” print within your artwork can have significant effect on the outcome too.For example, many people will use only black ink for their black graphics, text etc. This would be represented in CMYK and C = 0, M = 0, Y = 0, K = 100 (with the numbers being the percentage of that colour ink being used). What this produces is a very “weak” black that can look washed out and even grey.Other people producing artwork will do the opposite, and use C = 100, M = 100, Y = 100, K = 100. Whilst this produces a very strong black, the amount of ink being put down means that there is the potential for udging, earing. It can also lead to longer drying times.For best results, use C = 30, M = 30, Y = 30, K = 100. 10: Proofing Artwork.Not proof reading before sending to printThe final, perhaps biggest and yet most easily avoidable mistake when creating artwork files for your packaging is to not proof read before sending off!Typos, spelling and grammatical errors can make your business look slap-dash and unprofessional, potentially harming brand perception and ongoing sales.Besides proof reading yourself, it is also important to get at least one other colleague to check through and signoff on the copy. After writing or looking a document for a long period when creating the artwork, you can become blind the errors (your brain simply sees what it thinks should be there).Avoidable mistakes here can lead to costly wasted packaging and the need to purchase new printing plates.In Summary.Avoiding packaging artwork mistakesMaking a mistake on your packaging artwork can lead to significant costs for your business, both in terms of re-buying printing plates, wasted unusable boxes, and brand reputation.But get it right, and it can help raise awareness of your business. It can also convey important info and even help to boost sales.Just make sure you avoid the pitfalls of these 10 packaging artwork mistakes, or download the free step by step guide on how to create your artwork file by clicking here.
1409 views0 0

Doctor Blade Installation: Correct Angle and Pressure are Needed for Consistent Performance
The anilox roll and doctor blades are designed to work together to deliver a precise amount of ink to the plate. It is important to take time during a doctor blade installation in order to ensure print quality. A doctor blade that’s installed correctly will have uniform, balanced contact with the anilox roll and remove ink consistently across its surface. Blade positioning, orientation, angle and pressure will affect the delivery of a precise amount of ink to the plate, and proper installation will give the printer control over consistent, repeatable print quality.Doctor Blade InstallationPositioning and OrientationIt is essential that the metering and containment blades be positioned correctly when they are installed. Depending on the rotation of the anilox roll, the metering blade could be positioned on the top or the bottom of the chamber. Keep in mind that the metering blade is always the last blade to contact the roll before the ink transfers to the plate. The containment blade is installed in the opposite location. If the two blades are installed in reverse, the metering blade will not achieve the appropriate point of contact with the roll and remove the correct amount of ink before transfer. It is important to remember that the bevel tip should point away from the roll or towards the chamber to prevent streaking.AngleThe angle at which the blade comes into contact with the anilox roll is also crucial to proper doctor blade installation and optimum blade performance. Ideally, the contact angle should be 30° tangent to the anilox rollcircumference. In reverse angle and chamber blade applications, the doctor blade angle should be between 28° and 32°. If the blade angle drops below 28°, a larger part of the blade’s edge will come into contact with the roll. When this happens, the contact area is too big to meter effectively and the blade may allow ink to pass underneath or “hydroplane” at high speeds. If the angle exceeds 32°, it will result in faster wear on the blade.PressureWhen a doctor blade chamber is properly aligned, light pressure between the anilox roll and doctor blade is all that’s needed to produce a clean wiping action. The recommended pressure is 25 to 30 lbs. or 1.7 to 2 bars. Anything more than that will lead to a deterioration in print quality, wasted ink and substrate, and accelerated blade and anilox wear.A good way to tell if you’re using the correct amount of doctor blade pressure is to look at the roll once it’s inked. Before increasing pressure, the anilox roll will appear glossy. This is a sign that too much ink is remaining on the surface. Pressure should be increased gradually until a satin finish appears on the surface of the roll. A satin finish is a good indication that the correct amount of pressure has been achieved and the doctor blade is effectively shearing the excess ink from the roll. If pressure is increased beyond this point, the doctor blade edge will bend and hydroplane. The roll will again begin to look glossy because it is flooded with too much ink.The doctor blade plays a key role in the performance of the anilox roll and the printer’s control over print quality. Take the time to double-check blade positioning, orientation, pressure and angle during doctor blade installation to guarantee that the anilox roll delivers the precise volume of ink for which it was designed.
1408 views0 0

4 Mistakes To Avoid When Buying Flexographic Printing Machinery
You may think that, once you’ve decided to purchase a flexographic press in principle, that your work is done. However, getting to the point of making a purchase decision – lengthy as this may be – is only part of the process. There are several common errors which can occur, both during and after purchase, that can make your new press more of a challenge to work with than it needs to be. This article will cover four of these commonly-made mistakes.1) Choosing Surplus Features | Not Choosing The Right FunctionsModern flexo presses have many new technological options to choose from. From automation and colours to efficient drive systems and optional add-ons, you will likely be tempted by many features, but do you really need them? You will need to look at your current budget and needs, as well as into your business’s future growth plans for the answer.What kinds of jobs do you currently complete for your customers? Do you expect the types of jobs you do to change, and if so, how? Finally, will those changes require a particular drying system, automation level or one or more optional components? It may be that you have some extra capital to invest in a conveyor system, web cleaner or additional drying system, but if it won’t add value to what you offer or provide you with long-term ROI, it could be money wasted.On the other hand, not having enough of the right features in your press can quickly set you behind the competition. If this is the case, you will need to think about how far this may put you behind, and whether there is a way for you to make the additional investment and obtain those needed elements.The process of choosing the right press can be frustrating. For many businesses, it can lead to choosing a press that has a lot of advanced features, but that won’t be used to its full potential. In order to choose the best press for you, you should match your features with your plans for growth and expansion over the next five years, and choose a press that can grow with you to maximise your production potential.2) Not Choosing A Machine That Works With YouMany businesses will purchase a modern flexo press, and then modify their processes according to the capabilities of that press. This is a common error. The press chosen should be the one that’s most suited to your current process. The way to determine suitability is to test the press before you buy. A top priority when purchasing any flexo press should be to ensure that it can print at the level of quality you require for the substrates you will be printing on.3) Going For A Bargain PressThere’s nothing wrong with wanting to save money, especially on an investment as large as a new printing machine. However, where it comes to buying a flexo press, going solely for the lowest possible cost is not advisable. Whether a machine is cheaper because it is used, was made in the Far East, or doesn’t have many features, not considering the long-term benefits of spending more will be to your detriment. As well, a lower-cost press may also not be as easy to set up, be able to complete jobs as quickly or be as energy efficient as a more expensive machine. You need to think in terms of total cost/benefit over the lifetime of the machine, and not simply about your initial investment.4) Putting It Into Service Too SoonToday’s flexo presses are impressive pieces of machinery, able to produce high-quality at incredibly high speeds and allow for many functions to be carried out automatically. Even so, they do require some time to master. Placing a press into service before your operators have had the chance to fully understand how it works can have many negative results, including inadvertent damage being done to the machine. Enough time must be given to ensure not only that proper training has taken place, but that what was learned was correctly retained.
1315 views0 0

Ink Transfer Technology — Dot gain and ink film thickness
THE ISSUES RELATED TO APPLYING UNCONTROLLED INKIn the world of Flexography printing, customers are demanding higher profiled printing while utilizing (4) color process, (7) color HD or expanded color gamut and line work bringing breathtaking life to many packages.Whether it’s the most complicated printing job or the simplest line work, controlling the Ink Film Thickness is very critical when it comes to providing a high quality in a repeatable print job. Commonly known print problems such and dot gain and dirty print contribute to a loss of time and money with customer rejections and reprint costs, short stops for cleaning plates, press downtime for re-mounting plates, and additional job hours and materials to complete the order.As a general rule, the aller the doctor blade tip thickness in relation to the contact area, the cleaner the wipe resulting in less ink film thickness and a cleaner print.The doctor blade tip must be matched to the specific anilox line screen in order to maintain the correct ink film thickness. Today many companies are spending high dollars on state-of-the-art printing presses, anilox rolls, plate material and inks, often not taking into consideration how much of an impact the doctor blade has and the game changer it provides to improve quality, service and costs.
1194 views0 0

Anilox Roll Cleaning Essential to Effective Ink Delivery
You spend plenty of time selecting the correct anilox roll for a job. Careful consideration goes into line screen, cell geometry and cell volume in order to guarantee that a precise amount of ink or coating is delivered to the substrate. Aniox roll cleaning is essential to maintain this precision. If you neglect to clean your rolls on a regular basis, you will not get the most out of your anilox investment. Plugged cells will affect print quality and cause you frustration, waste and downtime. An anilox cleaning program consisting of daily, weekly and deep cleaning will preserve the integrity of the anilox engraving and ensure quality, press efficiency and longer anilox life.Benefits of regular anilox roll cleaning:The repeated transfer of a precise volume of ink or coating.Consistent coverage.Reduced labor and less downtime.Fewer job rejections and waste.Longer anilox life and lower re-working costs.Flexo Concepts recommends a 3-step anilox roll cleaning program:1. Daily wiping to prevent ink or coating build-upApplying a liquid cleaning agent by hand and wiping down the roll with a clean, lint-free cloth on a daily basis is the simplest and most effective way to prevent keep ink and coating from drying and building up in the cells. As a basic rule of thumb, the best time to clean a roll is as soon as it is removed from the press. The longer inks, resins, adhesives, etc. have been allowed to sit in the engraving, the harder these materials are to remove. To maximize cleaning performance, choose a cleaner specifically formulated to remove water-based, UV or solvent-based chemistries based on your application.2. Weekly scrubbing with a paste-like cleaner and an anilox cleaning brushManually scrubbing the roll once or twice a week with a brush and a paste or cream chemical cleaner will mechanically loosen and remove any ink or coating residue that remain in cells despite daily cleaning. The cleaner is applied to the roll, vigorously scrubbed in a circular motion with an anilox cleaning brush and flushed with water while the roll remains in the press. It is important to remember that stainless steel brushes are suitable only for ceramic anilox surfaces and brass bristles should be used for chrome surfaces to prevent damage to the engraving. 3. Monthly deep cleaning to remove tough ink or coating depositsOver time a residual amount of ink or coating material is left behind in the cells and the roll requires a deep cleaning to remove these tough deposits. The most common methods of deep cleaning are chemical wash and ultrasonic. The roll is removed from the press and placed into a chemical bath where it soaks in a powerful cleaning solution before being subjected to a high pressure rinse or ultrasonic vibrations to loosen and dissolve the deposits. These methods vary in cleaning effectiveness, risk of damage to the roll, and water and chemical consumption.
1277 views0 0
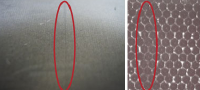
Top Causes of Anilox Scoring and How to Prevent Them
A score line in an anilox roll is a groove that has run directly through the engraved surface. The score shows a visible line in the printed or coated product and is irreversible. Once the surface is scored, the roll must be reconditioned or replaced. For these reasons, it is crucial to learn how to prevent scoring whenever possible. Below you will find an explanation on score lines, the different types and how to prevent them from occurring and keeping your print quality as high and consistent as possible. 3 types of score lines:Coetic or Preliminary.Lightly Polished.Severe or deeply gouged. What Causes Anilox Scoring?Over ImpressionOver impression can cause premature wear to the doctor blade and roll. Long Blade tip slivers can easily cause score lines: these are formed when the blade bends back causing wear on the side rather than the tip. As the side of the blade wears through, the tip breaks away in the form of a long metal sliver. Normal shavings from blade wear from “kiss impression” will not damage a roll.Doctor Blade Tip Material & SettingsAre you using the same blade for whites or metallic inks as you do for conventional ink? Using incorrect blade tip and material for type of ink can have disastrous results and hardened blades significantly increase the chance of scoring. The same can be said of replacing the blade on every anilox change. A blade “seats” to a specific LPI and is not meant to be used again. Blade forms to anilox and becomes a “Micro” saw. Finally, try resetting the doctor blade chamber after installing new blades. A worn blade is shorter than a new blade and if chamber does not reset, there will be excessive pressure.Try a nickel coated anti-scoring blade. Nickel is softer than steel and ceramic, many converters use this very successfully as it is more forgiving and can cover potential misgivings in the metering process. It will also last longer because of coating; cleaner doctoring because blade is stronger; resist corrosion better because the blade has a barrier coating. And remember, always use higher quality blades. A low quality low cost blade can break down fast.Helpful Hints1. Coated blades are more forgiving than uncoated blades.2. The doctor blades should never extend past the ends of the seals, but should be flush and even with the bevels on the end seal.3. A coated blade will offer more “forgiveness” than an uncoated doctor blade and compensate for error.4. Chattering blades vibrate and this action can act like a jack hammer to the ceramic and break cell walls.5. If too soft, improper end seals will cause leakage and operator might adjust setting to compensate putting more pressure on anilox and stress on the blades. Do not set chamber to stop leaking.6. Correct placement of end seals allowing even contact with anilox and consistent transfer of the ink film to plat.7. Shims break off or can become exposed to the anilox surface and cause scoring.8. Ink resins can glue pigments, blade metal and other debris to the blade.
1407 views0 0

Ghost Hunting in Flexographic Printing
Ghosting, a faint image from another part of the design that appears where it shouldn’t, has always haunted the flexo industry. Ghosting is most obvious in areas where large solids are used and always on printed side of substrate in the image area. What causes ghosting?Fortunately, the cause is far from supernatural. While much has been written on the subject, most agree on these six issues as the most likely causes of ghosting.Ink starvation.Ink fluidity is not appropriate.Chambered doctor blade not adapted.Mechanical issue.Anilox roll is not properly cleaned.Premature drying of ink on the anilox roll.What can I do?The next time you have an issue with ghosting, try working through each of these possible solutions.Increase ink level and/or pressure into the chambered doctor blade.Use higher anilox roller volume.Add solvent (retarder) to increase ink fluidity, to flood the cells, and avoid ink drying into cells.Use a specific design of the chambered doctor blade to force ink to flood the cells.Select anilox roller where the circumference is a whole number multiple of the repeat length of the design times the number of plates round the cylinder or change the diameter of the plate cylinder. Increase the speed of the machine.
1250 views0 0